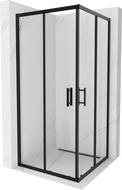
If you are planning a complete renovation of your bathroom, you most likely also have the replacement of your shower cabin in mind. Usually, the installation of a shower cabin with a tray is commissioned to professionals. However, it is not a difficult task to do it yourself. If you want to take on such a task by yourself, you must arm yourself with patience and diligently carry out the specified tasks step by step. Do not discourage yourself at the very beginning. The following instructions will help you and you will learn how to install a shower cabin with a tray. Decide if it will be easy for you to do it, or if you prefer to invest some of your funds in hiring a special team.
Where to Start the Installation of a Shower Cabin Yourself?
- The first step is to choose the right space for installing the cabin. It is closely related to the location of the sewer pipe inlet.
- If you decide on a high shower tray, you can easily secure it practically at any time, regardless of the height of the inlet. Choosing a low tray carries consequences that require adjustment to the inlet's location. If it is positioned at floor level or slightly higher, then there will be no problem with installation.
- Additionally, the pipes must meet the requirements of at least a two-degree slope, because otherwise, the water from the tray will not drain properly. The pipes should not be too long either.
- If you plan to place the tray far from the sewer outlet, the level differences can be even a few centimeters. However, if you place the tray too close to the outlet, it may turn out that there is no space for the siphon and pipes.
How to Install the Shower Tray?
Before you start installing the tray, you must properly prepare all surfaces. Secure your walls and floor with waterproofing, and also ensure the good condition of tiles and grouts. Once everything is ready, you need to roughly position the tray and check if everything aligns with your plans. For easier subsequent tasks, you can mark the drain location on the floor with a pencil, so that the installation of the siphon goes more smoothly later.
The next step is to install and level the supports for the tray, as well as to screw the brackets to the plate or side panel, where the tiles will be located. The next task you need to perform is to install and connect the siphon to the sewer using a flexible pipe. If its length is not suitable for our installation, it can be trimmed, and sharp edges can be smoothed with sandpaper. At this stage, it is also very important to properly position the seals, which will ensure the proper functionality of the entire structure. If the seals are correctly placed, we apply silicone or adhesive to the sides of the tray and fit it into the designated place, also securing it to the wall. It is important that it is evenly positioned, so make sure to check it with a spirit level.
Once the silicone dries, you should insert the upper part of the siphon through the drain hole and connect it with the part connected to the sewer. To check if everything has been done correctly, we can fill the siphon with water before finishing the work related to the installation of the tray. If there are no leaks, it means we did everything correctly and we can stick the feet to the base to stabilize our tray. The final step is to install the side panel and seal it with sanitary silicone. This must be done carefully so that there is no gap between the wall and the tray.
Shower Cabin Installation Step by Step
The installation of the shower cabin can begin after about 24 hours, which is when the silicone dries. The work should start by screwing all the components together.
- Vertical profiles should be connected with the upper and lower ones, and then silicone seals should be positioned in the correct places.
- The prepared shower cabin is placed on the tray to level it.
- Next, we mark the contact points of the cabin with the wall and drill holes for the plugs there.
- Once prepared, we apply silicone to the lower and side profiles of the shower cabin, place it on our tray, and attach it to the wall.
- After completing all these tasks, we can start installing the doors and walls of the cabin. With utmost care, you must install the rolling system so that there are no problems with opening or closing the doors in the future.
- It is worth noting that glazing can be problematic when installing the shower cabin yourself - to deal with it, you should apply sanitary silicone to the lower profile, insert the glass, add a silicone seal, and tighten the screws. The same must be done with the upper profile.
- The prepared glazing must be attached to the rolling system and tightened. If the screws are visible, use covers for a more aesthetic effect.
Thanks to our step-by-step instructions, the self-installation of the shower cabin should not pose a problem for you. All it takes is a little effort and patience, as well as adhering to all recommendations, to carry it out yourself and enjoy the well-done work.

