


Installing a linear drain is a functional and aesthetic addition to a modern bathroom. The solution was created with comfort and safety in mind for all users, including children and the elderly. The traditional installation of a shower and shower tray is slowly becoming outdated. If possible, a more practical approach is to install a shower cabin directly on the floor and equip it with a linear drain.
What will you learn from this article?
A linear drain is a functional solution for modern bathrooms. It looks good and is easy to maintain. Worth reading:
-
What do you need for the proper functioning of a linear drain?
-
Why choose a linear drain?
-
How to prepare the substrate and correctly install a linear drain?
What distinguishes the installation of a linear drain?
A linear drain is a system for effectively draining water from the shower area to the sewage system. It consists of a gutter, grate, and siphon. Most siphons are vertical, although horizontal siphons are appearing more frequently. The former provides high throughput, allowing for trouble-free drainage of water from the shower, while the horizontal siphon design makes it easier to fit everything under the floor. When choosing, it's worth paying attention to the quality of workmanship, as a linear drain must last for years, so it should be solid and durable.
The most popular and frequently chosen are:
-
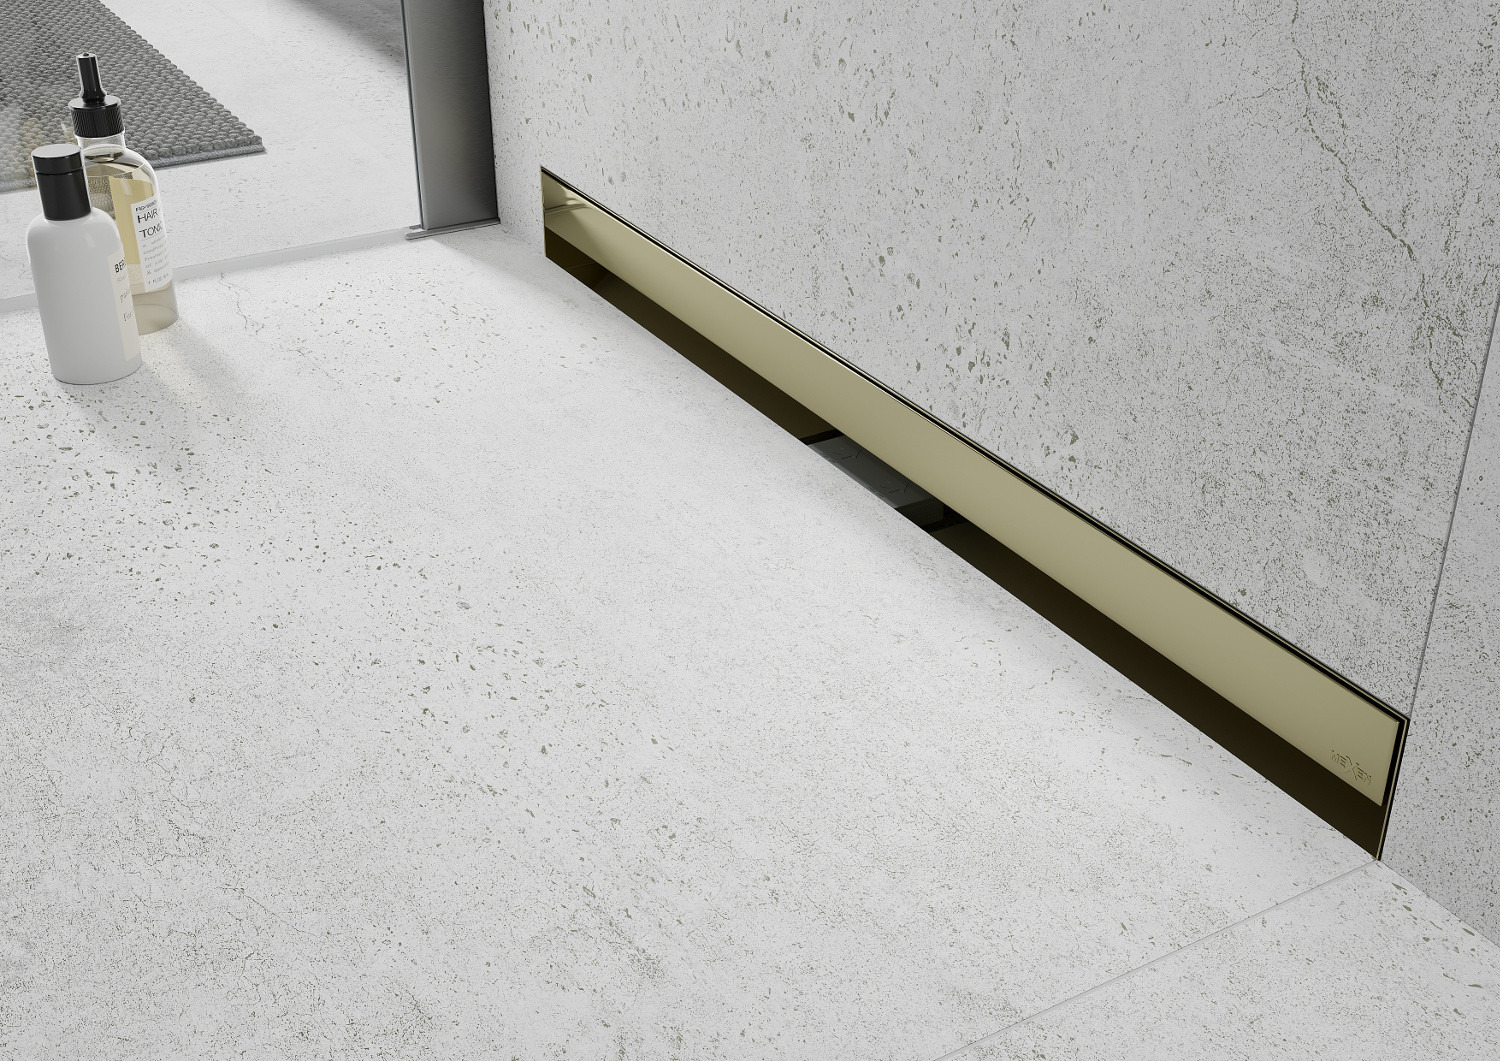
Floor linear drains — equipped with a decorative cover made of stainless and acid-resistant steel. They provide the creation of an impressive and functional interior with a minimalist design.
-
Wall linear drains — are part of the recessed technology category. They consist of a body embedded in the wall and a grate, which is a metal part that remains visible on the outside. Check the advantages and disadvantages of wall linear drains.
You must decide which drain will work best in your bathroom. Make the decision at the bathroom design stage.
What to consider when choosing a linear drain for a shower cabin?
When designing a bathroom, a common dilemma arises: shower tray or linear drain. You have already made your decision. To avoid regretting it, pay attention to a few important factors that will bring an aesthetic solution for draining water from the shower into the bathroom.
-
Drain dimensions — adjust the length and width of the installation to the size of the shower cabin.
-
Material — the highest quality models are made of stainless steel. They are corrosion-resistant. In any bathroom, they look perfect for years.
-
Siphon capacity — a wide range of solutions means you will undoubtedly find a drain that works efficiently even with a large water stream.
-
Design — the linear drain grate can take the form of a smooth metal panel, mesh, or have a pattern matching the bathroom's arrangement.
In the Floor or Wall — Ideal Linear Drain
A linear drain can be embedded both in the floor tiles and the shower walls. Regardless of the type of linear drainage chosen, it's worth remembering to maintain the appropriate floor gradient to ensure the proper direction of water flow from the entire floor surface to the siphon. Slope strips are essential for this. They are a very important element of a shower without a tray. They ensure the correct water gradient from the tile surface to the drain. Puddles do not form in the bathroom, and the comfort of using the shower cabin is very high. You can primarily opt for:
-
Stainless steel strips — classic and universal, characterized by a minimalist look. The material is resistant to corrosion and mechanical damage, and it is also easy to keep clean.
-
Aluminum slope strips — lightweight and flexible, tailored to individual needs due to many colors and finishes to choose from. The material is resistant to corrosion and easy to maintain.
Depending on the location of the drain installation, the slope should be made on one or both sides.
-
If the linear drain is located against the shower wall, the floor slope will be one-sided. However, for the installation of the linear drain in the middle of the cabin, a dual slope is required. The gradient should not be less than 0.5%, which means that the grate should be about 2 mm below the tile level.
-
Installing a linear drain in the wall also requires connection to a vertical sewage system, but it does not interfere with the tile, screed, or slab surface. However, it is also required that they be arranged to ensure an adequate water gradient. This type of linear drain is chosen in the case of underfloor heating. Learn how to install a wall linear drain.
Installing a Linear Drain — What to Consider?
To ensure that the water drainage system from the shower works flawlessly, proper installation of the linear drain is essential. Remember that such a drain must be adjusted to the floor level — as it needs to be above its connection point with the vertical sewage system. Such an arrangement of drainage pipes is not a problem if you plan to install the linear drain in a newly constructed building. In the case of a bathroom renovation, it may turn out that a floor that is too low or a siphon that is too high will not allow the linear drain to be installed in the floor.
Advantages of the Linear Drain
Installing a linear drain is a solution that has many advantages:
-
Economical use of the bathroom — the size of the shower cabin is not limited by the size of the shower tray.
-
Tile arrangement over the entire floor surface — the bathroom arrangement is coherent, elegant, and impressive.
-
Solution for the elderly and disabled — a shower cabin without a tray has no barriers. Anyone, even with mobility limitations, can enter it freely, without much effort.
-
Easy to keep clean — cleaning a shower cabin without a tray is easier and less time-consuming.
Step-by-Step Linear Drain Installation — Self-Installation, With Substrate Preparation and Appropriate Gradient
The decision to install linear drainage has been made! It's time to proceed with the implementation. Here are the steps you need to take to install a linear drain.
-
Choosing a linear drain — you need to adapt the type of drain to the installation location, i.e., the existing sewage approach and the size of the shower cabin.
-
Installing the sewage approach and installing the linear drain — fit the installation of pipes to the type of substrate, e.g., whether it is a ground floor, rib-and-slab floor, or monolithic. Remember the pipe slope, which should be about 2.5%, which is 2.5 cm per meter.
While performing the correct installation, you must ensure that its frame is higher than the sewage approach. The drain grate should be approx. 2 mm below the floor level.
-
Connecting the siphon and pipes to the sewage system — at this stage, a leak test must be carried out to ensure that the installation is not leaking anywhere. This will also assure you that the sewage approach is perfectly matched to the installed drain. If everything is tight, you can proceed to make the screed, which must include an appropriate surface slope and the thickness of tiles with adhesive, i.e., around 12 mm.
-
Waterproofing the floor and walls — when installing linear drainage, you must take care of the waterproofing of all walls that come into contact with water. Liquid foil works well, whose two layers appropriately protect against leakage.
-
Finishing, i.e., laying tiles — laying tiles is the last but no less important activity. Their choice will affect not only the design but also the safety and comfort of using the bathroom. It's best to buy anti-slip tiles with a high abrasion class. The tiles must also not be porous to prevent water absorption. Check the rules for designing an impressive bathroom arrangement. When laying tiles, remember to maintain the floor gradient in the direction of the drain.
Linear Drain Installation Without Secrets
Installing a linear drain requires precision and strict adherence to the manufacturer's instructions. You must maintain the appropriate level and inclination of the floor to ensure the effective drainage of water from the shower. Use sealing tapes, waterproofing, and other protections to ensure that water collects in the designated area but does not flood the entire bathroom space.
The main aspects to adhere to when installing a linear drain are:
-
Creating a screed with the appropriate slope, ensuring that water flows freely from under the shower.
-
Waterproofing the floor and walls, preventing leaks.
-
Installing a high-quality drain, made from the best materials.
Related products


Mexen Flat 360° Slim 360° Linear Swivel Drain 80 cm, Black - 1741080
€82.20 -19.96%
€65.79List price: €82.20
Lowest price: €65.79
Availability: In stock


Mexen Flat 360° Slim rotary linear drain 60 cm, brushed gun gray - 1E41060
€85.70 -19.97%
€68.59List price: €85.70
Lowest price: €55.76
Availability: In stock


Mexen Flat M01 linear drain 70 cm, brushed gold - 1A20070-15
€89.30 -19.94%
€71.49List price: €89.30
Lowest price: €58.12
Availability: In stock


Mexen Flat M12 linear drain 70 cm, rose gold - 1621070-15
€92.80 -19.95%
€74.29List price: €92.80
Lowest price: €60.40
Availability: In stock


Mexen Flat Wall wall linear drain 2-in-1 60 cm, gold - 1530060
€92.80 -19.95%
€74.29List price: €92.80
Lowest price: €74.29
Availability: In stock